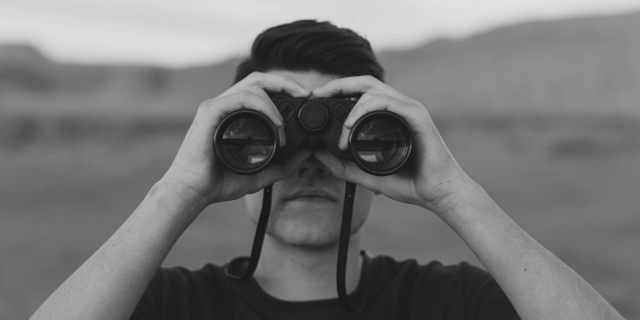
This might come as a surprise but binoculars are actually one of the best ways to get started in astronomy. They are not simply for daytime viewing. Those bins you use for birding, hunting or watching baseball games could also be used for stargazing. As mentioned in our Telescope Buying Guide, if you’re looking to buy a telescope but your budget is $100 or less, consider binoculars instead. They are your best option and will perform far better than any telescope at that price point.
Like telescopes, binoculars come in a range of types, brands and sizes. This binoculars buying guide covers all of the essentials including descriptions of each specification, what features to look for, explains the advantages and disadvantages of different binoculars and teaches you how to test binoculars before you buy. Take some time to learn about the basics and let us help you find the perfect astro binoculars!
Astro Binoculars

While not as powerful as a telescope, astro binoculars provide a wide field of view which allows you to see more of the night sky and makes locating celestial objects easier. You can see more details using both eyes with binoculars than you would using a small telescope with the same aperture. Using both eyes also allows for more natural viewing. Binoculars are simple to use, lightweight, extremely portable and should last a lifetime. Paired with a planisphere or a good book on astronomy, you can definitely become highly skilled at navigating the night sky with binoculars.
You might already own a pair of binoculars but they may not necessarily be ideal for astronomy. Although not all binoculars are suitable for astronomy, astro binoculars can be used in the daytime for bird watching, viewing wildlife, landscapes, landmarks and sporting events.
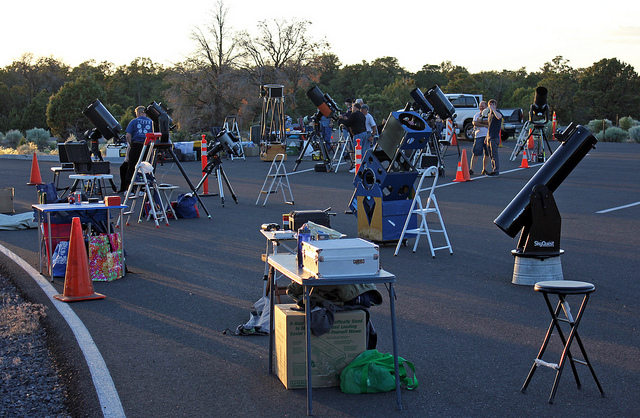
If you eventually buy a telescope, your binoculars will still see a lot of use as they make a great companion to a telescope. Most experienced astronomers observing with a telescope will also keep astro binoculars close at hand for wide view scans of the night sky and to quickly locate celestial objects.
Advantages of binoculars over a telescope for astronomy
- lightweight and portable – excellent for travel
- provide a wide field of view
- allow for more natural viewing as you can use both of your eyes
- show more detail than a telescope with the same size objective lens or primary mirror
- image is correctly oriented – right side up and not flipped
- can be used for daytime viewing
What can you expect to see with astro binoculars?
It’s important to have realistic expectations. Binoculars are not a substitute for a telescope. There are hundreds of interesting celestial objects that can be viewed with binoculars both in the solar system and beyond. But only a telescope can show planetary details, greater lunar detail, and better views of deep-sky objects.
The moon and planets are bright enough to be unaffected by light pollution. Expect to see fantastic views of the moon including its craters, mountains and maria (large dark spots). Mars will appear as a small red dot. You should be able to see the golden color of Saturn. Unfortunately you will not be able to make out Saturn’s rings as only a proper telescope can provide that amount of detail. However, with high power binoculars on a mount you will see that the shape of Saturn is not round. Experienced users may observe Titan, Saturn’s largest moon. The Galilean moons of Jupiter – Io, Ganymede, Europa and Callisto – will be visible as tiny points of light surrounding Jupiter’s bright disk. You can observe that their relative positions change each night as they orbit the planet. The phases of Mercury and Venus will be visible. Neptune and Uranus will appear as stars. Binoculars are also terrific for viewing comets, asteroids and even man made objects like satellites and the International Space Station.
Viewing deep-sky objects with binoculars will greatly depend on dark skies. The darker the skies, the better the opportunity to see fainter deep-sky objects. In large cities with heavy light pollution, only a few dozen stars may be visible to the naked eye. The number of visible stars increases to a few hundred in the suburbs or a small city. Under dark skies you should be able to see around 2,500 stars with the naked eye. With 10×50 binoculars under dark skies, more than 100,000 stars will be visible. You can expect to see many double stars and most of the 110 Messier objects including open and globular star clusters, nebulae and galaxies like Andromeda.
Binoculars Basics
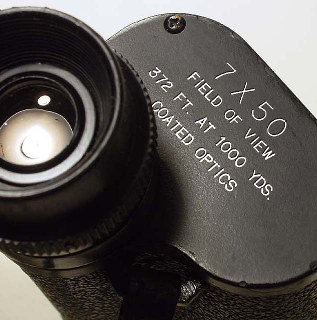
All binoculars are described using two numbers, e.g. 7×50. The first number represents the magnification or power (7x) while the second number is the aperture measured in millimetres (50mm). These two numbers along with the field of view should be engraved or printed somewhere on the binoculars. Common binoculars for astronomy include 7×35, 7×50 and 8×40 with 10×50 being the most popular.
Magnification
As mentioned above, the first of two numbers used to identify a pair of binoculars indicates its magnification. Binoculars that are 10×50 have 10x magnification, meaning that an object will appear 10 times closer than with the naked eye. A higher magnification will darken the background of the night sky and improve contrast, allowing you to see fainter objects and finer details but reducing your field of view. Generally, the visibility of star clusters, nebulae and galaxies improves with increasing magnification.
For magnifications above 10x, the shakiness becomes amplified making it difficult to hold the binoculars steady by hand. There are some tricks to minimize shaking like sitting in a chair, resting your elbows on a solid surface or leaning against a wall or fence. Large aperture, high power binoculars will require a proper mount.
Avoid ‘zoom’ binoculars with variable magnification (e.g. 10-22×50). They do not provide the precision and optical quality required for astronomy purposes.
Aperture
For binoculars, the aperture is the diameter of each of the objective lenses measured in millimetres. It is the most important specification to look for when buying binoculars. An objective lens with a larger aperture can collect more light providing a brighter and sharper image. The larger the aperture, the more objects you can see including fainter ones.
Aperture doesn’t matter too much for daytime viewing and the front lenses can be smaller as there is plenty of natural light. For night sky viewing, astro binoculars should have an aperture of at least 35mm but preferably around 50mm. Keep in mind that the larger the aperture, the heavier the binoculars will be.
Field of View
The field of view is the width of the area of sky as seen through the binoculars. It is usually described in degrees, in feet at a distance of 1000 yards or in metres at a distance of 1000 metres.
One degree equals 52.5 feet at 1000 yards. If the field of view is given in feet and yards, you can calculate the equivalent field of view in degrees by dividing by 52.5. So a field of view of 420ft/1000yds is equal to 8 degrees (420ft/52.5 = 8). If the field of view is given in metres at a distance of 1000 metres (e.g. 140m/1000m), divide by 17.5 to calculate the field of view in degrees. A field of view of 140m/1000m is equivalent to 8 degrees (140m/17.5 = 8).
Exit Pupil
Light enters the binoculars through the objective lenses and exits through the ocular lenses in the eyepieces. If you hold the binoculars out in front of you while pointed towards a light source, you should see a small round disk that appears to be floating behind each eyepiece. The diameter of this disk of light is called the exit pupil. Ideally, the exit pupil should be no larger than the eye’s pupil. The size of the eye pupil can vary widely between individuals and also decreases with age. If the binoculars have an exit pupil larger than your eye’s pupil, that extra light is wasted and you could get away with using smaller aperture binoculars with a smaller exit pupil.
To calculate the exit pupil for a pair of binoculars, divide the aperture by the magnification. For 10×50 binoculars, the exit pupil is 5mm (50mm/10 = 5).
Eye Relief
Eye relief is the distance in millimetres between the eyepiece’s ocular lens and the observer’s eye while still being able to see the entire field of view. Binoculars with a long eye relief can be held further away from your face without reducing the field of view. This is especially important for those who wear eyeglasses as the glasses will force you to hold the binoculars away from your face. An eye relief of at least 15mm is typically necessary for those wearing glasses.
Eyecups that extend from the eyepieces serve two purposes. They block stray light and ensure that the proper eye relief is maintained while the binoculars are held to your face. They are typically made from rubber and either roll up and down, slide up and down or twist up and down. Most eyeglass wearers will use binoculars with the eyecups down.
Interpupillary Distance
Interpupillary distance is the distance between the center of the pupils of the observer’s eyes. The hinge allows binoculars to be adjusted to fit a person’s eye spacing by moving the barrels closer together or farther apart. When the eyepieces are in the correct position relative to your interpupillary distance, the separate images from each eyepiece will combine and the viewing area will appear as a single circle. Children and some women may have an interpupillary distance that is smaller than standard binoculars can accommodate and should try compact binoculars instead.
Prisms
Binoculars come in two styles based on the type of prisms used. Prisms correct the orientation of the image seen through binoculars so that it appears as it would with the naked eye. Without prisms, the image would appear upside down and laterally reversed. Prisms also fold the light path allowing binoculars to be much shorter.
There are two types of prisms used in binoculars:
- Porro prisms
- Roof prisms
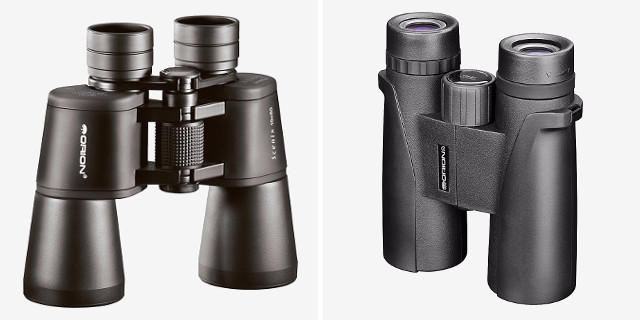
Porro Prisms
Binoculars using Porro prisms have a stepped appearance. The eyepieces are close together while the objective lenses are offset and further apart. Porro prism binoculars provide the best value for money as they are cheaper to manufacture and less expensive than roof prism binoculars. The disadvantages are that Porro prism binoculars are larger and heavier than roof prism binoculars and are also more difficult to fully waterproof.
Roof Prisms
Binoculars using roof prisms have a sleek H-like appearance. The eyepieces and the objective lenses are inline with each other. They are smaller and lighter than Porro prism binoculars and also easier to waterproof. The downside is that roof prism binoculars are more expensive, requiring costly precision manufacturing, and special mirror and phase correction prism coatings.
There is no noticeable difference in performance between Porro prisms and roof prisms.
Types of Prism Glass
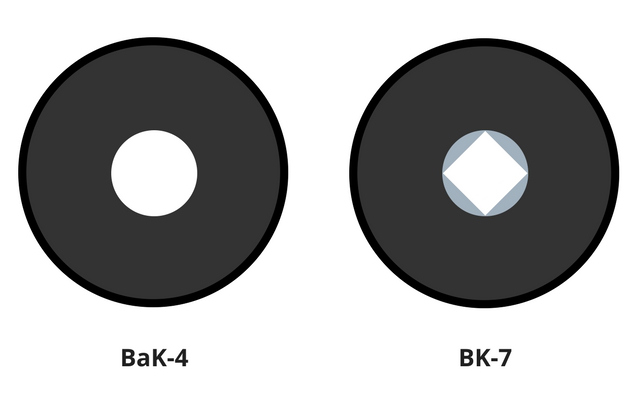
The prisms used in binoculars are made from one of two types of glass: BaK-4 (barium crown glass) or BK-7 (borosilicate crown glass). Look for prisms made from BaK-4 glass as it is of higher quality. BK-7 glass is cheaper and not as good.
To determine the type of prism glass used, hold the binoculars out in front of you pointed towards a light source and look at the exit pupil. If the exit pupil appears perfectly round then the glass is BaK-4. With BK-7 glass, the exit pupil will appear square with grey-blue edges.
Coatings
When light passes through a piece of glass, a percentage of light is reflected and lost. Binoculars have multiple air-to-glass surfaces which means multiple opportunities for light loss. Proper coatings increase the transmission of light through the lenses and reduce the amount of light that is reflected resulting in a brighter and sharper image. There are various terms used to describe binocular coatings including ‘coated’, ‘fully coated’, ‘multi-coated’ and ‘fully multi-coated’. Although there is no standard definition of these terms, they are commonly described as the following:
Coated – at least one air-to-glass surface has a layer of anti-reflective coating.
Fully coated – all air-to-glass surfaces have a layer of anti-reflective coating.
Multi-coated – at least one air-to-glass surface has more than one layer of anti-reflective coating while the other surfaces have one layer of coating or none at all.
Fully multi-coated – all air-to-glass surfaces have more than one layer of anti-reflective coating
The best way to determine the quality of the coatings is to physically inspect the binoculars. Fully multi-coated lenses should indicate higher quality and offer the best performance.
It’s highly unlikely that you will find new binoculars that are not coated. The type of lens coatings should not be a deal breaker. One exception is to avoid binoculars that advertise ‘ruby-coated’ lenses. They are typically found in cheap binoculars and are an indication of low-quality optics.
Focus Systems
There are two main types of focusing mechanisms for binoculars. The most common is the center-focus control which uses a wheel or knob to move both eyepieces back and forth to achieve focus. Most center-focus systems also have a separate diopter adjustment to adjust focus for one eyepiece, typically the right side, independently of the other to compensate for differences in vision between the observer’s two eyes.
The second type of focusing mechanism involves independent focusers for each eyepiece. Focusing each eyepiece is a slower process than using a center-focus control. Binoculars with an independent focus system tend to be more rugged and waterproof. The best quality binoculars will have independent focusing.
For astronomy purposes, celestial objects do not require continual refocusing as their distance does not change.
Comparing Binoculars
There have been several attempts to quantify the relative performance of binoculars with different combinations of magnification and aperture. In our opinion, the best and most realistic rating system used to compare binoculars is the Adler Index. Binoculars ranking higher on the Adler Index will have better performance, all other things remaining equal.
To calculate the Adler Index rating, multiply the magnification by the square root of the aperture. For example, 7×50 binoculars have an Adler Index rating of 49, while 10×42 binoculars have a rating of 65. This indicates that the 10×42 binoculars should outperform the 7x50s.
The table below compares the Adler Index rating of several astro binoculars:
| Binoculars | Adler Index Rating |
|---|---|
| 7x35 | 41 |
| 7x50 | 49 |
| 8x40 | 51 |
| 8x42 | 52 |
| 10x42 | 65 |
| 10x50 | 71 |
| 15x70 | 126 |
| 20x80 | 179 |
| 25x70 | 209 |
The Adler Index is a helpful tool but keep in mind that it’s just a simple calculation. It is no substitute for testing binoculars in person.
How to test binoculars before you buy
If you are buying binoculars in person or inspecting an existing pair of unknown specifications and origin, there are some steps you can follow to evaluate their quality and performance:
1. With a bright light behind you, look at the reflections in the objective lenses. Darker reflections are best and indicate quality lens coatings. Multi-coated lenses will have deep green or purple reflections while white reflections indicate a complete lack of lens coatings.
2. Inspect the surface of each objective lens for scratches and look inside for dust, dirt or fungus.
3. Perform the same tests as above while inspecting the ocular lenses (eyepieces) instead.
4. Hold the binoculars out in front of you pointed towards a light source and look at the exit pupils. You want to see perfectly round and uniformly bright circles of light. Exit pupils with a diamond shape (edges that look cut off) indicate undersized prisms, a cost-cutting measure by the manufacture that will dim the image. Square exit pupils with grey-blue edges indicate full-sized prisms, however the prisms are made from inferior quality BK-7 glass.
5. Check the collimation of the binoculars to ensure that the two barrels are optically aligned. Poor collimation may strain your eyes and cause discomfort. You may see double images if the collimation is really bad. Good quality binoculars should maintain collimation for several decades while some low budget binoculars may lose collimation during shipping.
6. Look out a window or step outside and find a high contrast object like a tree, pole or building against a bright sky. Color fringing along the edges of the object indicates chromatic aberration. A little chromatic aberration is to be expected, however some binoculars will suffer more than others.
7. The image seen through binoculars with a wide field of view may lose sharpness and appear blurry along the edge of the view. This distortion may be worse in some binoculars than others so it’s best to compare multiple binoculars.
8. If you wear glasses, check that the eye relief is long enough for the entire field of view to be visible while wearing your glasses. Make sure the eyecups are not extended.
9. Test the focusing mechanism and diopter adjustment to ensure they are smooth throughout their entire range of motion.
10. Check the hinge by moving the barrels back and forth. Ensure it is smooth throughout its entire range of motion with consistent resistance.
11. Shake the binoculars and listen for rattling or internal noise. Binoculars should not have any loose internal parts.
12. How does the weight of the binoculars feel when held to your face? If your arms tired after a few minutes of holding the binoculars, they are too heavy. Try a lighter pair with a smaller aperture or plan to use a mount.
13. Inspect the rubber eyecups for cracking or splitting.
14. This step is not necessary unless you really want to be thorough. Some binoculars may actually have a smaller aperture than specified due to the internal optics and construction. Your 10×50 binoculars might actually perform as 10x40s. Shine a flashlight through one of the eyepieces and measure the diameter of the disk of light exiting the objective lens projected on a wall or piece of paper.
15. Looking at a bright star in the night sky is the ultimate test of optical performance for astro binoculars. Bring a star to focus in the center of the field of view. While focusing, the star should stay round without any rays extending from it. The star should appear sharp and pointlike. Move the binoculars so that the star is near the edge of the field of view. Is the star still sharp?
Image-Stabilized Binoculars
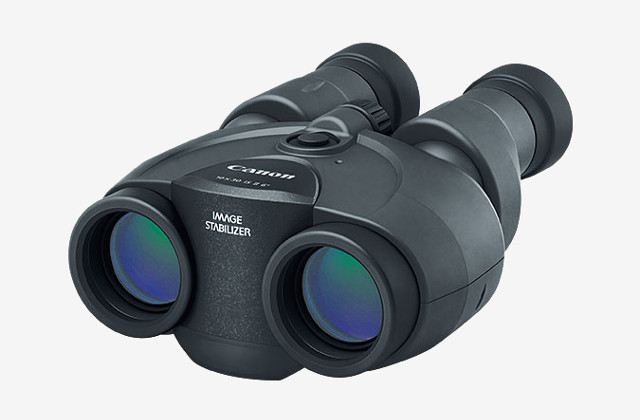
The view through image-stabilized binoculars is seriously impressive, especially when experienced for the first time. Push a button and the battery-powered stabilizing mechanisms magically stop the image from shaking. With a perfectly steady image you can take advantage of higher magnifications and smaller apertures with better performance than traditional binoculars. Sounds too good to be true, right? Well, image-stabilized binoculars can be quite expensive. Expect to spend anywhere from $500 to $1500.
Mounts
Holding binoculars steady can be quite challenging. It’s incredibly frustrating to have your target object in view while it’s constantly shaking and jiggling around. You’re just not going to see much. The largest binoculars that most people can comfortably hold by hand while maintaining a steady view are 10×50.
Magnifications higher than 10x will only increase the shakiness and make observing more difficult. Binoculars with apertures larger than 50mm can be quite heavy and uncomfortable to hold longer than a few minutes. If the magnification is higher than 10x and/or the aperture larger than 50mm, consider mounting the binoculars to improve steadiness and give your arms a rest.
A monopod is a very portable and lightweight mount with adjustable height. It consists of a pole that extends from the ground to your eye level and a ball-head which allows the binoculars to be tilted in all directions. Monopods can be used while seated or standing. If the monopod will be used on an angle (not vertical) when seated or slightly reclined, a spiked foot at the base of the monopod can be stuck in the ground to keep it in position.
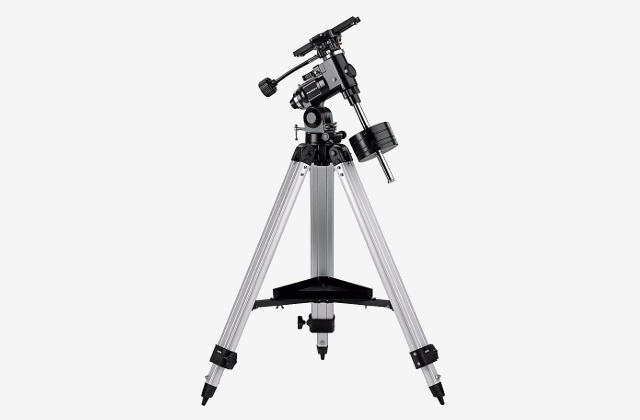
Using a tripod will provide better stability than a monopod. Binoculars with a tripod adapter can be mounted to most standard photo, video or telescope tripods via an L-bracket. However, some tripod heads may not permit viewing at or near the zenith. Tripods with an adjustable height center post should allow use while standing to view objects overhead. It’s important that the tripod is sturdy and the weight of the binoculars does not exceed the weight capacity of the tripod.
Parallelogram mounts offer the best viewing experience. They are versatile and can be used while sitting, reclined or standing. It’s incredibly easy to adjust the position of the binoculars with the silky smooth 360-degree motions. A counterweight balances the weight of the binoculars which can be raised or lowered while staying fixed on the target object. There are no restrictions to viewing directly overhead. A parallelogram mount can be purchased either with a tripod or separately and attached to an existing tripod.
What are the best astronomy binoculars for beginners?
For beginners wondering what astro binoculars to buy, we recommend 10×50 Porro prism binoculars. They offer a good balance of aperture size, magnification, weight and affordability. The 50mm objective lenses are relatively large and provide enough light gathering ability to see faint objects. Compared to 7×50 binoculars, the increased magnification of 10x50s will make objects appear larger and also darken the background of the night sky which allows easier detection of faint deep-sky objects. Most people should be able to comfortably hold 10×50 binoculars by hand and keep them steady. If you don’t think you will be able to, consider smaller binoculars like 7×50, 8×40 or 8×42.
Budget
A good budget for astro binoculars is between $100 and $300 with plenty of solid options at the lower end. There are functional low budget binoculars, however expect to find cheap build quality, BK-7 glass, poor coatings, collimation issues, and possibly a smaller aperture than advertised. On the other end of the spectrum, some giant binoculars and those with special features like image stabilization can cost upwards of several thousand dollars. For the recommended 10×50 Porro prism binoculars, there are several good quality choices for around $100.

 Jupiter provides the most detail of the planets offering views of its cloud bands, Great Red Spot, and 4 Galilean moons